This fun and easy (albeit, sticky) DIY project cost me .99! Well, $100.99 if you include the cavity I will need to have filled, but I digress...
See this jar of yummy gumdrops?
I've been staring at this jar (which is now 1/2 full) in my office for 2 weeks! I glare at the co-worker who dared bring these in while I stuff my face with them (but only yellow and purple) and then it finally hits me on how to stop this madness... CRAFT TIME!!!
Supplies:
Gum drops
Fishing line
Scissors
Needle
Step one: Gather supplies, dump out your gum drops, eat a few and get ready to get sticky!
Step two: Start jabbing those cavity causers with the needle
Step three: String up as many as you need to, as close as you want them. If you don't use the whole bag, that's ok, you'll have leftovers to eat!
Step four: Wash hands and hang your garland!
I couldn't decide where to hang mine... where do you think?
Wednesday, March 27, 2013
Monday, March 25, 2013
Nailed It!
Yesterday, I set out to repaint a sofa table... yesterday, it was cold... and when you pit cold vs. spray paint, cold wins. So after sanding down the table, my numb and vibrating hands thanked me for bringing them inside for a different project. And this project involved SHOES!
See these shoes? I haven't worn them in years! But since I never throw away shoes, it seems the retro/chunky heel trend has resurfaced... and so, from the depths of my closet, have these shoes.
This project is great for shoes you find on consignment or ones you just can't toss away - up/recycle them into NEW trends. And the trend I am DIY-ing - metallic cap toe.
Supplies:
Pair of shoes
Pencil
Nail polish (I did metallic silver)
Paintbrush (I used an angle brush)
Step One: Draw the outline of your cap toe with the pencil. I was able to erase and adjust to make sure they matched.
Step Two: Paint on the polish. You will most likely need a few coats. I used 4 since it was a metallic silver. Make sure you let each coat dry, just like your nails. (Note: I did this on another pair of nude heels using hot pink polish - that took only 2 coats)
Step Three: Once you have the desired look and coverage let them dry overnight
Step Four: Wear with confidence!
This project cost me $2 (nail polish)... $9 if you include the shoes purchased, on sale, 5 years ago.
Hope this inspires you to breath new life into some forgotten shoes and upcycle your way into a trendy Spring!
Tuesday, March 5, 2013
Where Are My Non-Pastel Peeps?
Did you know that Saturday is Daylight Savings? No? Me either. Thankfully, the cashier at the coffee shop did and as I paid for my morning brew, I groggily noticed the reminder sign she hung.
Seeing this sign means Spring is coming and that solidifies 2 things for me today - 1: deciding to not wear tights with my skirt is now a justified decision and 2: starting to put up Easter decor is A-OK!
Easter, for me, is no where near Christmas when it comes to the amount of decor I attempt to shove into my small home. And while I am known for devouring entire packages of Peeps in one sitting, I am not known for enjoying the pastel colors that Easter is traditionally known for. No offense if you do, it's just not my cup of tea.
Every year I attempt to find neutral/non-traditional Easter decor and every year, fall short. Last year, I took matters into my own hands... I scooped up 3 foam eggs at Michaels after the holiday- scoring 3 different sizes for a total of $3 (Love 80% off). They were originally pastel pink, blue and purple - which translates to no, way, and Jose.
Enter Easter 2013, my kids and acrylic paint!
My supplies:
2 kids: one 11 and one 7
Paint: (I chose)cream, grey and chalkboard black
Brushes
3 eggs (one for each of us)
We each took a brush and a color and went to town...
It took about 3 coats of paint per egg and clearly you can use any color you want! From here, embellish away or just leave alone. I am still debating this last step - do I add buttons or no? What do you think? And while you are helping me - what the heck should I write on my chalkboard egg??? I'm at a loss for words...
Seeing this sign means Spring is coming and that solidifies 2 things for me today - 1: deciding to not wear tights with my skirt is now a justified decision and 2: starting to put up Easter decor is A-OK!
Easter, for me, is no where near Christmas when it comes to the amount of decor I attempt to shove into my small home. And while I am known for devouring entire packages of Peeps in one sitting, I am not known for enjoying the pastel colors that Easter is traditionally known for. No offense if you do, it's just not my cup of tea.
Every year I attempt to find neutral/non-traditional Easter decor and every year, fall short. Last year, I took matters into my own hands... I scooped up 3 foam eggs at Michaels after the holiday- scoring 3 different sizes for a total of $3 (Love 80% off). They were originally pastel pink, blue and purple - which translates to no, way, and Jose.
Enter Easter 2013, my kids and acrylic paint!
My supplies:
2 kids: one 11 and one 7
Paint: (I chose)cream, grey and chalkboard black
Brushes
3 eggs (one for each of us)
Here is the during - you can still see some blue of the egg |

Tuesday, February 26, 2013
French Country Room "Oui" Do
French Country Dining Room:
Our client had started in the right direction with a lovely blue on the walls and white wainscoting. From there we were able to re-use and re-purpose a lot of their existing furniture and were delighted with all the amazing pieces that once belonged to our client's grandmother.
One major focal point in the room was the fireplace. All we did was paint the mantel, simplify the decor and voila!
Fireplace BEFORE |
Fireplace AFTER |
Fireplace AFTER (side view) |
A focal point that was at the request of our client, a plate wall. They had a collection of blue/white/yellow plates and desperately wanted this look. As you can see, we gave them just that.
Plate Wall BEFORE |
Plate Wall AFTER |
Next, we worked on the small corner of the room. This area was positioned in between the opening to their kitchen and the sliding doors to a deck. They wanted this corner to function as a holding area for BBQ supplies in the summer. We gave them that and doubled it as a dry bar.
Corner Area BEFORE |
Dry Bar/Hutch BEFORE |
Corner and Bar AFTER |
Moving to the next corner we worked off the inspiration pictures we had our client pin to pinterest. One in particular popped out - it showcased a yellow corner hutch. Thanks to Craigslist, we scored the perfect hutch and after some glazing and distressing, it filled that corner perfectly.
Corner BEFORE |
Corner AFTER |
Another wish our client had was a proper buffet. To buy one was not in our budget so when "picking" their house, we spied a 6 drawer pine dresser in the cellar and decided to rework it and bring it back to life. By cutting out the bottom 2 rows of drawers, adding MDF for a base and back, painting and distressng and adding new pulls, it went from trash to ultimate treasure. The perfect piece to highlight grandmother's antique picture and serving ware.
"Buffet" area BEFORE (recall this pc. became the bar) |
Buffet AFTER |
Buffet AFTER |
![]() |
Buffet AFTER |
Lastly, the client wanted their table/chair set to stay, but the chandelier to change (and they wanted shades added). With budget getting tight, we looked to our trusty friend, spray paint, and completely transformed the style and gave them the pop of red they requested.
Chandelier BEFORE |
![]() |
Chandelier AFTER |
Table Setting with Fireplace |
Table Setting with Hutch |
Check out the full room - panoramic style!!
We hope this room makeover inspired you in some way! Stay tuned for most posts highlighting staging techniques and DIY projects from this re-do!
au revoir mon ami
Thursday, February 14, 2013
Love is a flower, you've got to let it grow
Love is a flower, you've got to let it grow.
- John Lennon
Yep, I'm a sucker for quotes. And I'm also a sucker for paper flowers! Why, well, because they don't die! And, since I love paper in all its fun patterns and colors, what better way to use it!
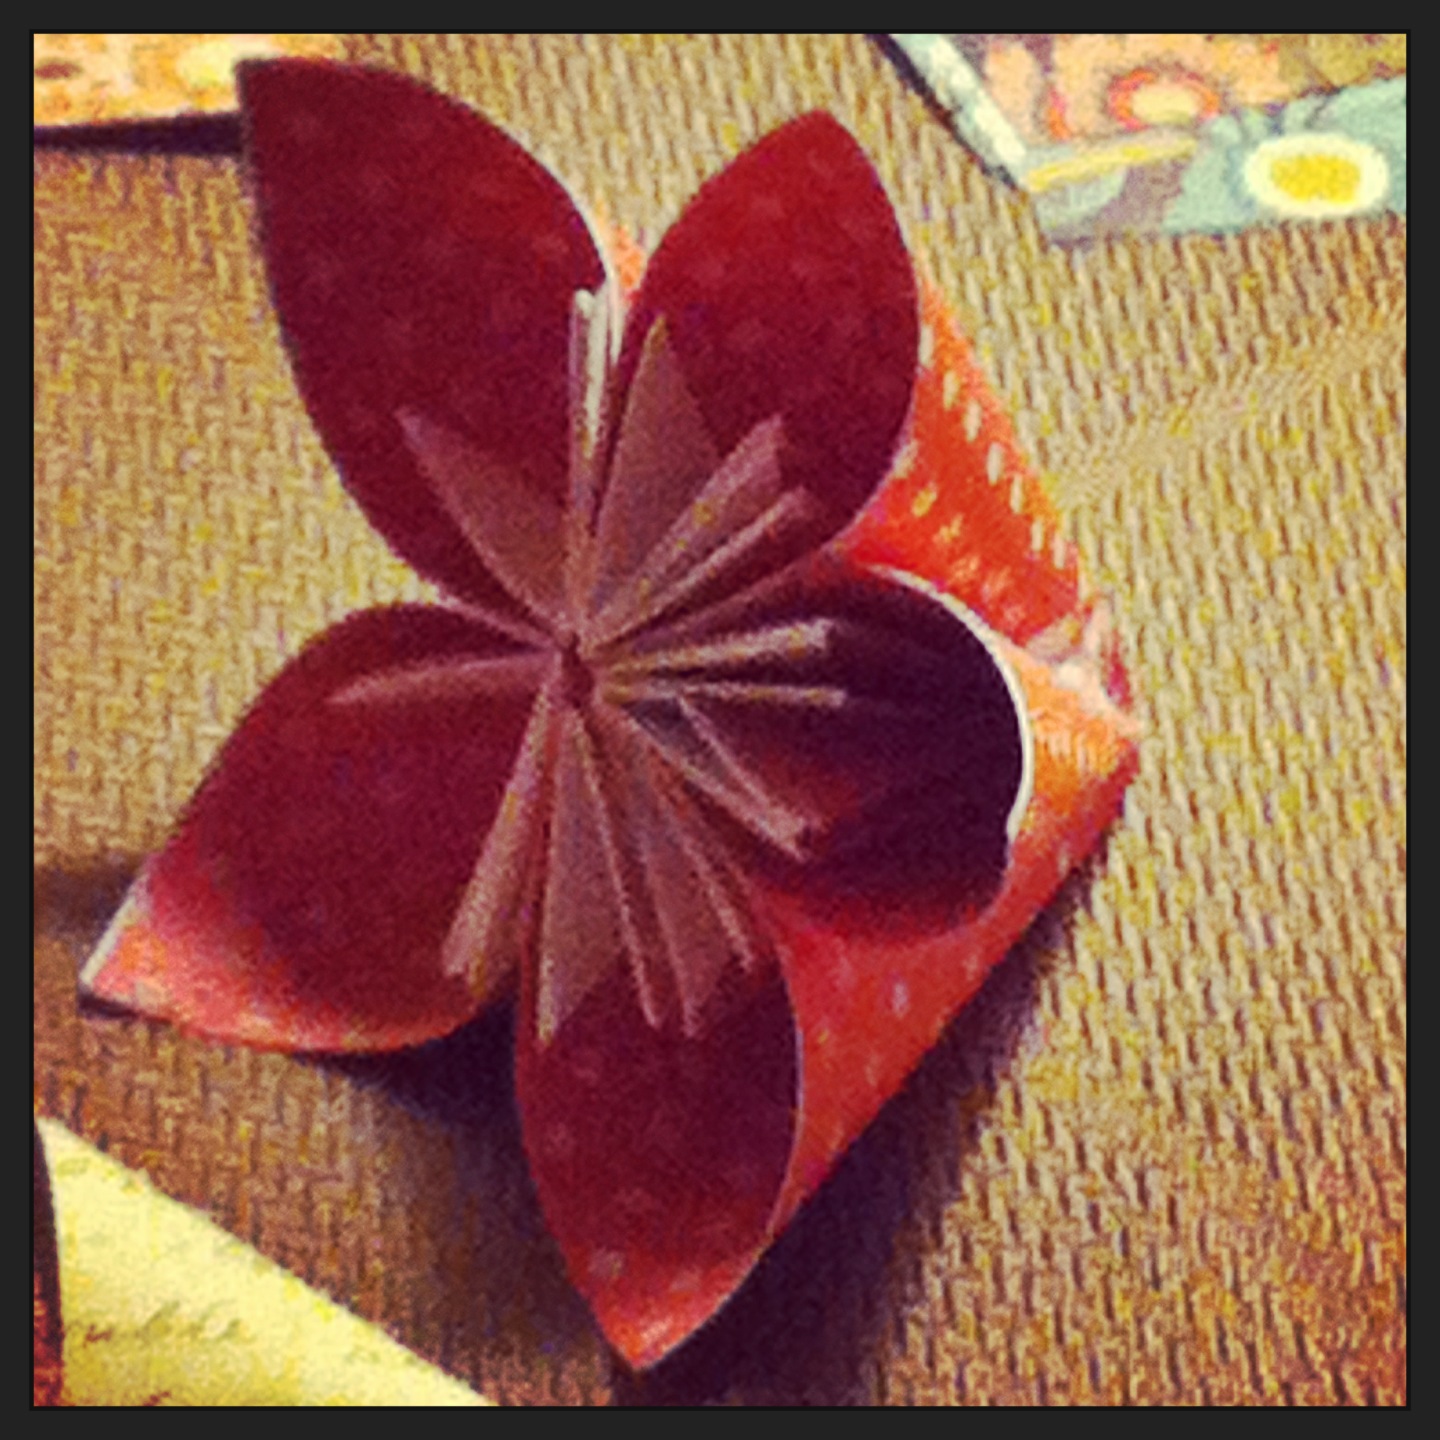
I first caught wind of the traditional Oragami flower- Kusudama- while scouring Pinterest for wedding bouquets. I did not want real flowers and I wanted to think outside of the box. So many possibilities for these beautiful, everlasting flowers - here's how it is done!
Begin by cutting squares of paper - any size will do - the one above is a 3x3 square. You can do 5 squares of the same paper or mix up each petal!
It is a 6 step folding process to make 1 petal - 5 petals = 1 flower!
Begin by cutting squares of paper - any size will do - the one above is a 3x3 square. You can do 5 squares of the same paper or mix up each petal!
It is a 6 step folding process to make 1 petal - 5 petals = 1 flower!
Step two: Fold one bottom corner tip up to the top
Step three: Fold the other corner tip to top (you will now end up with a smaller square)
Step four: Insert your finger into one of the "pockets" to gently pry it open and push down on the center fold to make a kite shape - repeat for other side
Step five: fold over the tips of your "kites" to once again make a square
Step six: Fold the "kite" edges over onto themselves using that center fold as a guide
From here,you are going to glue on the outside of the "kite" fold you just did
Fold the glued edges together and clip while it dries (I invested in a lot of binder clips)
Once dry, "fluff" out your petal so you can see the interior folds. Repeat for 4 more petals and glue them all together in a circle.
Here you can add a button for embellishment or leave it plain. You can then do a variety of things:
1. Hot glue a wire stem - clump a bunch together to make a bouquet - check out the premiere issue of Flea Market Style Weddings or see my wedding bouquet on my lifestyle blog
2. Punch a hole into one petal and string twine or ribbon through to make an ornament
3. Glue to a pin back or headband to make super cute accessories
4. Add to your gift wrapping for a unique look
Let us know how you use these adorable paper flowers! We'd love to see pics!
Tuesday, February 5, 2013
Vintage Bathroom Storage
No, my bathroom isn't vintage (unless you consider 1980's pre-fab a vintage), but my bathroom does lack storage - especially on the sink top. That means, with only 1 bathroom in the house (YIKES) and 4 people, odds are the sink area will be cluttered. And my husband hates clutter. And his hatred has worn off on me :). But lately, he has liked my creative ways of storing things - even when they are rusty/chippy/vintage! BONUS!
A few weeks ago, I eyed a perfectly chippy side table that would fit just right in between my bathroom sink and toilet. It also had a shelf at the bottom - so 1 table + 2 shelves = more storage!
Sunday, I bought said chippy table, cleaned it off, slapped on poly to stop the chips from molting and set it in my bathroom. While buying my new chippy (I am really enjoying this word today) table, I also came across some old coffee/tobacco/lard tins. Then it hit me... put them together - you have whimsical/industrial/vintage storage that makes your pre-fab home unique!
I am really loving how this turned out
Subscribe to:
Posts (Atom)